How to Clean an ATV: 8 Steps for a Safer Ride
Aug 18 2026
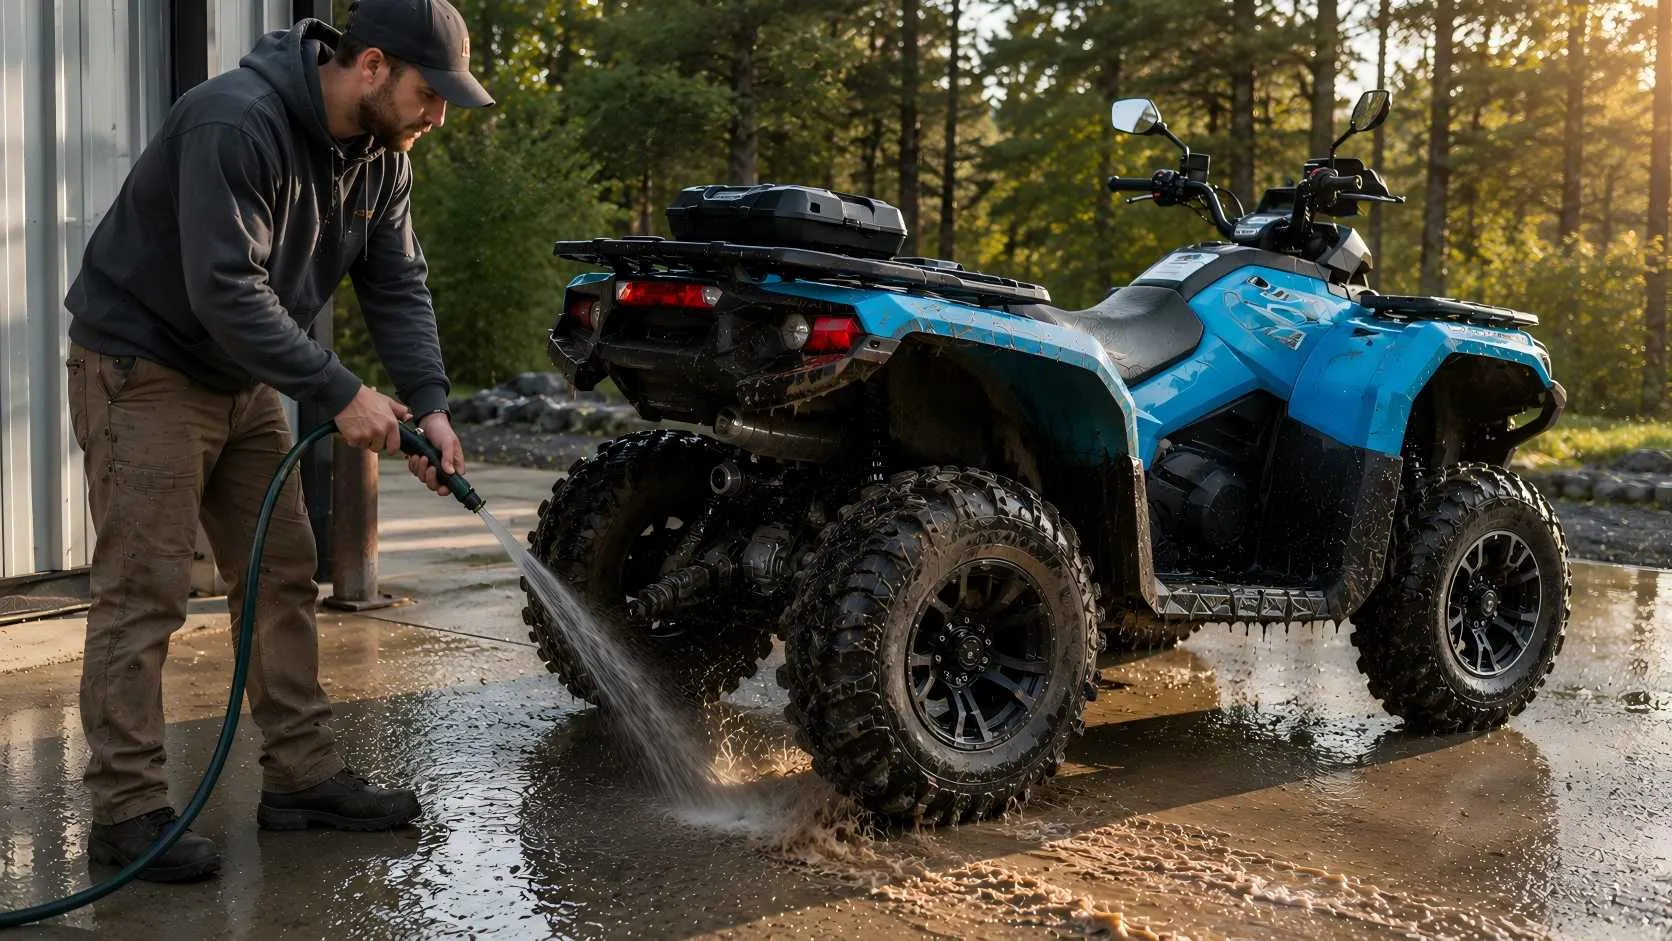
Look, cleaning your ATV? It’s not for the ’gram. Seriously. The real reason is way more down-to-earth. You need to get that crusty mud and grit off. Before it chews up your machine.
Think about what happens after a good sloppy ride. Wet soil, sand, pebbles—they pack into every gap. Under the skid plates. Around the suspension. Right up against the engine case. Leave it there. Let it dry hard. Now it’s like sandpaper. Grinding on your bearings. Eating into seals. Clogging those radiator fins so your engine can’t dump heat. Not good.
And here’s the kicker: a lot of folks just grab a pressure washer. Crank it. Blast away like they’re cleaning a driveway. Big mistake. That forces water and crud straight into electrical plugs and wheel bearings. So if you really want to know how to clean an ATV—the safe way—you need a system. A routine that doesn’t do more harm than good. These eight steps? They’ll get you there. Wash it right. Check it over. And you’re set for the next ride.
Why Should You Clean Your ATV After Riding?
Don’t skip this. Cleaning right after a ride isn’t optional if you care about your bike lasting.
That muddy sludge holds moisture. Sits against your frame, your axles, your skid plates. Over time? Rust. Plain and simple.
Worse—when mud packs into the radiator fins—those little aluminum vanes that shed heat—it blocks airflow. Less air means hotter coolant. Hotter coolant means you’re flirting with overheating. Nobody wants to be that guy limping back with steam pouring out.
There’s another angle too. A clean machine is easier to inspect. When everything’s caked brown, you can’t see a tiny oil weep. Or a hairline crack in a fender. Or a suspension bolt that’s backed off half a turn.
For ATVs used in mud, wet trails, or demanding off-road conditions, cleaning after a ride can be an important part of keeping up with ATV maintenance. It’s not vanity—it’s catching small problems before they turn into big bills.
Where Should You Wash an ATV?
Pick your spot with some thought.
You don’t want muddy, oily runoff heading into storm drains. Or a creek. Or your neighbour’s garden. Don't wash where muddy or oily runoff can enter storm drains, waterways, or sensitive landscaping.
Best bet? A concrete driveway with decent drainage. Or a proper wash bay if you’ve got one nearby.
What Do You Need to Clean an ATV?
Right tools make all the difference. Go in with just a hose and a rag? You’ll scratch plastics or miss the stubborn stuff.
Here’s a practical starter kit—nothing fancy, just what works.
Rinsing and water stuff:
Garden hose
Pressure washer (handy, but optional)
Wash bucket
Microfiber towels
Brushes and scrapers:
Soft wash mitt or sponge – for plastics, and only plastics
Soft-bristle brush – frame and suspension arms
Stiff/long-handled brush – tyres and rims
Plastic scraper – only for thick, softened mud on skid plates or underbody. Never on painted panels.
Chemicals that actually help:
ATV-safe detergent or mild car soap
Degreaser – make sure it’s safe for mechanical bits
Chain cleaner and chain lube – if you’ve got a chain-drive
Plastic protectant and polycarbonate windshield cleaner
How to Clean an ATV in 8 Steps
1. Let the ATV Cool Down and Protect Openings
First rule: never hit a hot engine with cold water. Sudden shock? Cracks things.
Let the engine and exhaust cool until they are no longer excessively hot before washing. After a normal ride, this may take some time, while heavy riding or hot weather can require longer. Always follow the cooling and washing instructions in the owner's manual for your specific ATV.
So chill out. Grab a drink. Wait.
Before you even turn on the hose, check your manual. Some bikes need you to plug the exhaust or intake. Others don’t. Either way, never spray water directly into these openings.
And if you need to get underneath? Use a proper jack or stand. Don’t prop it on a wobbly log.
2. Remove Loose Mud With Low-Pressure Water
Don’t start scrubbing dry, rock-hard mud. That’s asking for scratches.
Instead, gentle low-pressure spray. Soak the whole thing from top to bottom. Start with the upper body panels and work downward toward the wheels and undercarriage.
Give that dried mud a few minutes to soften. Now it rinses or scrapes off easier. Saves your body plastics from unnecessary abrasion.
Got thick layers under the belly? use a plastic scraper only on thick, softened mud on areas such as skid plates or underbody surfaces. Avoid scraping body plastics or painted surfaces. This knocks off the bulk, so your soapy water doesn’t turn into chocolate milk right away.
3. Use a Pressure Washer Carefully
Yes, you can use one. But treat it like a scalpel, not a sledgehammer.
High-pressure water can damage seals, displace lubricant, and drive water into areas that are not intended for direct high-pressure exposure.
So keep it on the lowest effective setting. Wide fan spray. Never hold the nozzle too close.
Target tyres, wheel wells, skid plates, really grimy chassis bits. Keep the nozzle moving—never linger.
And absolutely avoid blasting: electrical connectors, bearings, radiator fins, intake/exhaust openings, and decals (they peel off embarrassingly fast).
4. Apply ATV-Safe Soap and Scrub From Top to Bottom
Now elbow grease time. Work top down: body plastics first, then seat, then frame, then wheels and undercarriage. Why? So dirty water from below doesn’t drip onto clean areas above.
Super muddy? Try the two-bucket trick. One bucket with your ATV-safe detergent mix. Second with plain rinse water. Dip your mitt in soap, wash a panel, then rinse the mitt in the clean bucket before reloading soap. Keeps grit off your plastics.
Use that soft microfiber wash mitt for plastics and the seat. Stiff brushes stay away from those surfaces—unless you like swirl marks.
5. Clean the Wheels, Undercarriage, Chassis and Drivetrain
Mud loves to hide. In wheel spokes. Around the swingarm. Behind skid plates. All over the drivetrain.
Grab your stiff brush and dig in. Especially where mud traps moisture or blocks airflow—like near the radiator and chain.
And remember, cleaning needs can also vary by machine configuration, since different ATV types may have different drivetrain layouts, body protection, and access to areas that collect mud. A utility quad with full floorboards is different from a sport machine with exposed linkages. Adapt.
6. Rinse Until No Soap or Mud Remains
Scrubbing done? Switch back to low-pressure for the final rinse.
Rinse until no visible soap, loose mud, or heavy dirt remains on the vehicle.
Again, top to bottom. Be thorough around the seat underside, engine perimeter, body panel gaps. Leftover detergent residue dries into white streaks. So take that extra minute to flush it all clean.
7. Dry the ATV Completely
Skipping this? Big mistake.
Water left sitting in gaps? That breeds corrosion. Oxidises electrical contacts. And never throw a cover over a wet ATV—traps moisture, invites mildew.
Here’s a solid routine:
Towel dry – clean microfiber towels for plastics, seat, exposed metal.
Air blower or compressed air – use controlled airflow (not a high-pressure jet) to blow water out of tight spots, near seals, around connectors. Keep the nozzle at a respectful distance.
Air dry – leave it in a ventilated spot until completely dry, then garage it or cover it.
Safety note: after washing, test the brakes at low speed in a safe area because water on the braking surfaces can temporarily reduce braking performance. Just a gentle squeeze to dry discs and pads—no drama.
8. Lubricate, Protect and Inspect After Washing
Wash isn’t finished until you’ve put some love back into moving parts.
Lubricate applicable grease points, joints, and chains according to the owner's manual—restores the protective film that washing stripped away.
Check around electrical connectors for trapped water. If you see moisture, blow it out gently. If specified by the manufacturer, apply dielectric grease only where recommended by the owner's manual.
Then, if you like, apply plastic protectant on compatible surfaces. Helps shield against UV rays, and makes next wash easier.
Pressure Washer vs Garden Hose for ATV Cleaning
Which one? Depends on how deep the mud is—and what part you’re cleaning.
Cleaning Method | Best For | Main Advantage | Main Risk | Pressure Guidance |
Garden Hose | Routine cleaning and sensitive areas | Easy to control; low risk of vehicle damage | Slower on heavy, dried-on mud | Low pressure; safest general option |
Pressure Washer | Heavy mud and underbody chassis | Faster mud removal from wheel wells and skid plates | May damage seals, fins, decals or electrical parts | Use the lowest effective pressure and a wide spray pattern |
Low-Pressure Rinse | Radiator, plastics and sensitive areas | Better water-flow control | Requires more manual scrubbing | Use low pressure and keep the nozzle at a safe distance |
Air Blower | Drying gaps and trapped water | Removes hidden moisture | Does not remove dirt | Use controlled airflow |
How to Clean Specific ATV Parts
How to Clean ATV Plastics
Soft wash mitt and soapy water. Gently wipe. Once dry, you can apply plastic protectant if the product allows. Never use stiff brushes or dry rags on dried mud—instant scratches.
How to Clean ATV Tires and Wheels
Stiff brush + cleaner to break up baked-on mud from ATV tires and wheels. Want to use tyre dressing? Only on sidewalls. Never on the tire tread that hits the ground—that gets slippery and dangerous.
How to Clean an ATV Radiator
This one’s delicate. Avoid using a narrow, high-pressure stream directly on the radiator fins. The force bends those thin aluminum vanes. Restricts airflow. Hurts cooling. If you can reach the radiator from the side or back, rinse at a gentle angle to flush mud out—don’t blast straight into the fins.
How to Clean an ATV Chain
Chain-drive? Keep the pressure washer away from it. For ATVs equipped with chain drive, avoid directing high-pressure water at the chain, as it can damage seals and remove lubricant from areas that require protection. Use a soft brush and chain cleaner instead. After it’s completely dry, apply fresh chain lubricant per your manual.
How to Clean an ATV Windshield
Avoid glass cleaners or chemicals that are not approved for polycarbonate, especially ammonia-based products if the windshield manufacturer advises against them. Start with a low-pressure rinse to wash off surface grit, then use a dedicated polycarbonate windshield cleaner with a microfiber cloth. Wipe gently to avoid hazing.
What Should You Never Do When Cleaning an ATV?
1. Don’t aim high‑pressure water at seals, bearings, electrical connectors, or radiator fins.
2. Don’t spray water into intake or exhaust openings.
3. Don’t scrub body plastics with stiff or dirty brushes.
4. Don’t use harsh, unapproved chemicals on plastics or polycarbonate windshields.
5. Don’t store the ATV while it’s still wet.
6. Don’t apply tyre dressing to the tread or plastic protectant to handgrips or footrests.
How Often Should You Clean an ATV?
There’s no fixed schedule. Depends entirely on where and how you ride.
The cleaning needs of an ATV can vary because ATVs are used for different purposes, with recreational riding, property work, and other applications exposing the machine to different types of dirt and moisture.
But a good rule:
After muddy or wet rides – clean as soon as you can. Wet mud hardens like concrete and traps moisture. The sooner, the easier.
After dusty or sandy rides – lighter rinse and wipe often enough. But do check your air filter, CVT intake/exhaust areas (if fitted), and suspension joints for grit.
Before long-term storage – give it a thorough wash, dry it completely, and do a full lubrication routine before parking it for months.
What Should You Check After Cleaning an ATV?
Hidden bonus of a good wash: you can actually see your machine again. Perfect time for a quick inspection. Not just “is it clean?”—but “is anything broken?”
After the ATV is fully dry, run through this post-wash inspection checklist:
Tires and tire pressure – look for cuts, embedded rocks, unusual wear.
Brake operation and pad wear – inspect pads and discs, test feel during a slow roll.
Radiator fins – confirm no mud remains and no fins are bent.
Air filter condition – pop the airbox, make sure it stayed dry.
Electrical connections – check for moisture around connectors.
Chain tension and lubrication (if equipped) – verify correct slack and lube coverage.
Suspension bushings and A-Arms – inspect CV boot boots for cracks or tears.
Oil, coolant, or fuel leaks – scan the engine case and differential for fresh drips or stains.
FAQ About Cleaning an ATV
Can I pressure wash my ATV?
Yes, but carefully. Lowest effective pressure. Wide fan tip. Keep the nozzle moving. Avoid direct spray on seals, bearings, electrical connectors, radiator fins, decals, and openings.
How long should I let my ATV cool before washing?
Wait until the engine and exhaust are no longer uncomfortably hot. Might take 20–40 minutes after a moderate ride—longer after heavy work or hot weather. Check your owner’s manual.
What soap should I use to clean an ATV?
Stick with a mild, ATV-safe detergent or automotive soap. Never dish soap, bleach, or aggressive degreasers on plastics—they dull or discolour.
How often should I wash my ATV?
After muddy or wet rides—asap. For dry, dusty rides, you can stretch it, but always do a visual check.
Can I use a pressure washer on an ATV chain?
Not recommended. High pressure can force past O-rings and strip lubricant. Use a soft brush and dedicated chain cleaner.
How do I dry an ATV after washing?
Towel off big surfaces, use a blower for tight areas (don’t blast seals), then let it air-dry completely in a shady, ventilated spot.
What should I do after washing my ATV?
Dry everything. Test brakes gently at low speed. Go through the inspection points. Lubricate all moving parts and the chain as specified in your manual.
Clean Your ATV Before Your Next Ride
Make a habit of cleaning and checking after every dirty ride. Pays off.
It’s not about looking good—it’s about knowing your machine. Inside out.
Combine the wash with a thorough dry, basic lube, and that post-wash once-over. You’ll catch little issues before they become big headaches.
Keep your owner’s manual handy—your best reference for specific lubes, torque specs, model-specific quirks.
And remember: learning how to clean an ATV is simple, but doing it consistently—and checking the machine afterward—helps keep your vehicle clean, protected, and ready for the next ride.
So go ahead. Get it dirty. Then bring it back to life with a wash that actually does the job.
-
Aug 18 2026
learn more
 How to Clean an ATV: 8 Steps for a Safer Ride
How to Clean an ATV: 8 Steps for a Safer Ride
How to Clean an ATV: 8 Steps for a Safer Ride
-
Aug 13 2026
learn more
 What Is an ATV Differential Lock? How It Works & When to Use It
What Is an ATV Differential Lock? How It Works & When to Use It
What Is an ATV Differential Lock? How It Works & When to Use It
-
Aug 12 2026
learn more
 What is the Best ATV on the Market for Hunting?
What is the Best ATV on the Market for Hunting?
What is the Best ATV on the Market for Hunting?
-
Aug 12 2026
learn more
 Are Quads and ATVs the same?
Are Quads and ATVs the same?
Are Quads and ATVs the same?